TM5: NOW SUPERCEDED BY THE TM7 See link above
INSTALLATION INSTRUCTIONS
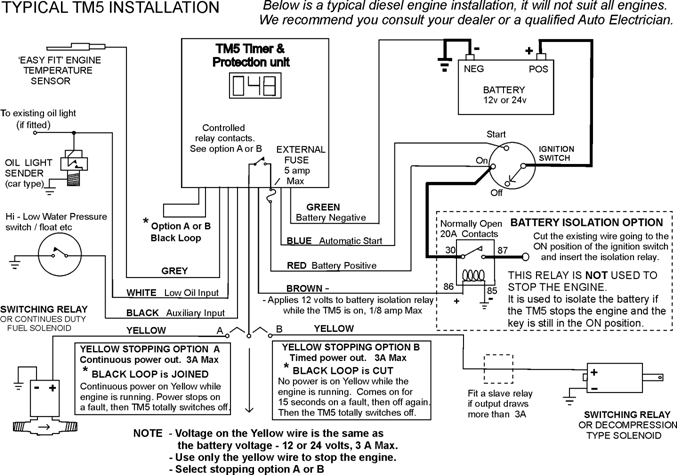
- Mount the unit upright with a water loop in the cabling and away from vibration, weather and water damage - (On a post and covered, if no other support is handy).
Use the screws provided to mount the unit. Do not allow it to float around freely on its wiring.
2. Bolt the sensor firmly to the engine in a location that will reflect its working temperature, yet not exceed 125 degrees Celsius (255 degrees Fahrenheit). If required use the protective sleaving supplied and avoid mounting the sensor near the exhaust manifold.
If the sensors 10mm hole needs enlarging carefully file it out, do not use a large drill or squash the sensor barrel in a vice.
3. Wire as per the diagram over. Select the correct output on the Yellow wire that suits your application by cutting the black loop, either option A or B.
Power wires are via the ignition switch. If required, use the battery isolation relay provided.
The oil pressure wire goes to an oil light sender. (Not a pressure gauge sensor). If the engine is not equipped with an oil light sender, discard this wire or fit a sender that uses normally closed contacts with no oil pressure (an inexpensive car type sender).
NOTE. The stopping device used (eg. fuel solenoid, stopping solenoid or relay) must be the same voltage as the battery. If it draws more that 3A, fit a slave relay in the Yellow output.
INITIAL STARTING INSTRUCTIONS
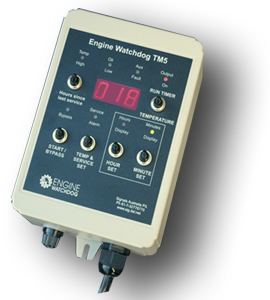
1. Turn the ignition switch to RUN (do not start the engine) and momentarily press the TM5’s START / BYPASS switch (TheTM5 will start, the display will light up and the protection circuit Bypass light will blink for 1 minute).
2. Ensure the Temperature Shutdown Alarm is set higher then required (factory set at 100C / 212F).
3. If either the white Low Oil or black Auxiliary wires are used, ensure its corresponding fault light is on.
4. Set the Service Alarm counter to the number of hours required before the next service is due (factory set at 100 hours).
5. Start the engine while the bypass light is blinking and ensure all fault lights go out before 1 minute is up. (You may need to repress the ‘Bypass’ switch within a minute if more time is required).
6. Run the engine to operating temperature, take note of this temperature.
7. Once at operating temperature, accurately set the Engine Over Temperature Shutdown Alarm.
EVERYDAY ENGINE STARTING
1. Turn the ignition to RUN and then either -
- continue switching the ignition to START if the blue Automatic Start wire has been used.
- Or for a manual start, press the ‘Start / Bypass’ switch and then continue to turn the ignition to START.
2. Once the engine is running, ensuring all fault lights are out before the 1 minute bypass light stops blinking. For more than 1 minute of bypass time, repress the START / BYPASS switch before the first minute is up.
3. Check if the engine ‘Service Alarm’ light is on, indicating the engine requires servicing.
4. Set the Run Timer if required.
Trouble Shooting:
Unit comes on when cranking the engine but it will not stay on. - Main Fuses is blown (5A Max) or red input wire is disconnected.
Unit will not come on manually. - Check the Fuse (5A Max). - Check for correct wiring (see diagram)
Unit comes on sluggishly but goes off when Oil or Aux lights go out. – Green wire is disconnected from the battery negative.
Fuse blows. Check wiring diagram. - Check for shorts. - Check output is not drawing excessive current (3A max.)
Engine stops but no fault is evident. – Check the temperature setting. – Check oil or auxiliary circuits. – Check timer setting.
Unit is intermittent or erratic. - Check connections (crimps) - Check for excessive vibration
Temp light is on and display just reads 127. – Unit is at maximum operating temperature, move sensor position (125 deg C Max)
Temperature displays 001 but alarm temp reads ok. - Check the sensor wire is not broken along its length, at the sensor, or if the cable is crushed
Orange output light is on (Yellow wire has power) when it should be off - Unit is in A mode, cut the thin black loop
Orange output light is off (Yellow wire has no power) when it should be on - Unit is in B mode, join the thin black loop.
I am using a FUEL SOLENOID and the engine will not stop even if the orange output light is off – Check fuel is not bypassing the solenoid via a bleed pipe, bleed pipes must return to the top of the tank, (the engine must stop when the yellow wire is disconnected from the fuel solenoid).
Oil or Aux light is staying on. – Disconnect associated wire (white or black) and the light must go out, or else it is shorted to ground.
Brown wire does not have 12v on it. – The wire has been shorted to ground or over loaded, the internal fuse is blown, contact Signals for help.
Service Alarm light is on – Service the engine & reset the service counter, see ‘To reset the Service Counter & turn off the Service Alarm light’